How pleasant it is to do something interesting with your child that you could then show in kindergarten or at school. And maybe even participate in competitions with their crafts.
DIY crafts for do-it-yourself kindergarten
Parents from an early age should teach children to collaborate. Kids in kindergarten age will not be able to do this or that craft from beginning to end. Up to 6-7 years, and sometimes older, they need help and advice from their parents.
Even very tired children are literally transformed when they sit down together with their mother to sculpt or draw something. Before school, the subject of creativity is not so much important as the presence of a loved one.
Quite often, educators offer to do it yourself and bring crafts to a kindergarten for some holiday, for example, for Easter. It is amusing to observe how soon various works of the family creative process appear on the teacher’s table.
Nest with easter eggs
The best children's crafts are obtained when they in their complexity correspond to the age of the children. The child should actively participate in the creation of Easter crafts, otherwise the next time he does not have a desire to needlework.
The application "Nest with Easter Eggs" is an example of a simple but effective crafts for the bright Easter Holiday. In order to create it from start to finish, you need 1-2 hours. It all depends on how developed the child is to perform complex operations.
For the application "Nest with Easter Eggs" you will need the following materials:
• a sheet of color cardboard;
• colored paper;
• shell from pistachio nuts;
• gouache paints;
• brush;
• PVA glue;
• a little sisal.

Step 1. Thoroughly rinse the shells of pistachios, preferably with a dishwashing detergent. This is necessary so that the shell sticks better, and for this they need to be degreased. Then you need to put the shells to dry.
Step 2. Measure with a ruler the cardboard in width. Estimate what size your nest will be. In order to cut a nest, you can use the old known method: bend a sheet of paper in half and cut a figure. So your nest will be symmetrical.
Step 3 Stick a “nest” of paper, leaving the top open to create the illusion of volume. If your child likes to draw, then you can ask him to paint a nest of colored paper before it is pasted. This can be a weave of twigs, blades of grass.
Step 4 Color the eggs from the shells in different colors. You can add an element of study to this lesson. For example, very small ones can be taught to guess colors. And older children - to give the task to paint seven eggs in all colors of the rainbow. At the same time, and learn these colors in the right sequence. "Eggs" put to dry.
Step 5. After the final drying, gently paste the pistachio shells in the upper part of the nest. In order not to get your fingers dirty, you can slightly sprinkle future eggs with acrylic varnish. It does not smell and is not allergenic, therefore it is suitable for working with children. If it is not, a regular hair spray is suitable, although it does not completely replace acrylic.
Step 6. After some time, when the glue dries, we put a little sisal in the "pocket" of the nest. This natural fiber is sold in many craft stores. Hooray! DIY for Easter is ready for kindergarten!
This craft will look even more joyful if supplemented with wonderful floral applications. You can decorate the background with hand-drawn flowers, flying birds or butterflies.
Crafts for Easter do it yourself to school
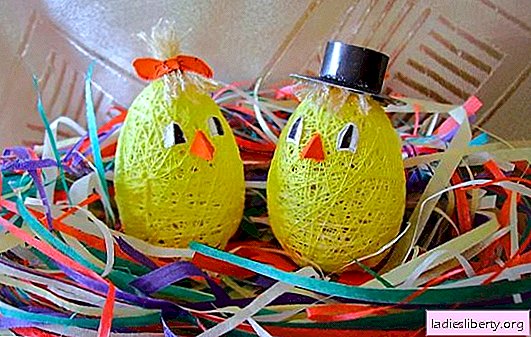
With older children, you can try to do something more complicated. For example, Easter candles in the form of eggs. Beautiful and original, but most importantly - interesting. The process of making candles is so exciting that it is impossible to tear yourself away from it.
Easter candles in the form of eggs
When students are asked to do crafts on Easter with their own hands and bring them to school, the question always arises: how to interest the child so that he does most of the work himself?
Buy the usual cheap paraffin candles and invite your child to tear himself away from the computer. And instead of it - to melt paraffin, adding dyes there. And if you adjust the wick yourself, then the next time your student will ask you to do something interesting for the holiday.
For the article "Easter candles in the form of eggs" you will need the following materials:
• several paraffin candles;
• chicken eggs (by the number of future candles);
• wax crayons;
• decorations for candles: napkins for decoupage, stickers on Easter eggs, sparkles.

Step 1. Make a small hole in the egg. Then, on the other hand, we make the exact same small hole.
Step 2 Pour the contents of the egg into a bowl. You can carefully help yourself with any tool or spoon. The main goal: not to crush the shell.

Step 3. We find an old candle: we need a middle from it. And from the paraffin candles, carefully remove the wick. There are many ways to do this neatly, but the best one is to cut the candle along.
Step 4 We put the paraffin in an old washed and dried tin can, which we put in a water bath. In no case can you put the jar directly on the fire - paraffin can catch fire.
Step 5. We place a tin can with paraffin in a saucepan with a small amount of water and put it on the fire. Gradually add the same pieces of wax crayons, achieving the desired color.
Step 6. If there is no detail from the old candle, you can replace it with a piece of plasticine.
Step 7. We fix the wick and place it approximately in the center.

Step 8 We fix the wick using stationery tape. We seal the hole completely, so that paraffin does not leak when filling out the form.
Step 9. We fill any heat-resistant container with ice. It should be conveniently placed in the form for a candle.
Step 10. Having established a form in the ice, we make sure that it takes a vertical position. We need ice so that under the action of hot paraffin the adhesive tape does not begin to move away from below.

Step 11. We fix the wick with a toothpick as shown in the photo.
Step 12 Pour the paraffin into small portions so that no voids form. You can experiment and pour small portions of different colors.

Crafts for Easter do it yourself in school! In order to give them a finished look, you can decorate them with glitter sparkles or stick ready-made Easter stickers.