The technique of performing flowers from satin ribbons came from distant Japan.
Women enjoyed decorating their hair with numerous garlands on holidays.
On weekdays, the outfits were more modest.
The order of weaving is simple.
It is distinguished by the detail and brightness of the colors used. Flowers are made only of fabric.
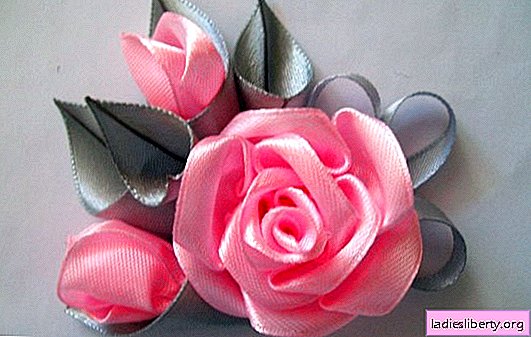
A simple technique for making kanzashi flowers from satin ribbons
An example was a living rose flower. You can use satin fabric, for example, pink shades, in contrast to those shown. It is recommended that you purchase a 125 mm wide satin ribbon in the store.

Toolkit and improvised materials: fabric of different shades, a needle and thread in tone.
Step 1
A tape is taken in hand. The upper corner is tucked and sewn onto a double stitch.
Step 2
The tape is folded into a roll at 6 revolutions. The edges should be rolled equally equally.
Step 3
Now the tape is bent at an angle of 45 degrees, and then it is wrapped once around an existing roll. To successfully fix the fabric and maintain the desired shape - the tape is stitched.
Step 4
In a similar technique, at a 45-degree angle, the future rose folds further. Each turn of fabric is fixed with a stitch.
Step 5
When the rose finds the desired shape and volume, the satin ribbon can be cut off, and the tip sewn to the bud.
Step 6
To top it off, the rest of the kanzashi flowers from satin ribbons are folded in the overall picture of the fabric. An elastic band for hair is sewn to each flower. After that, the jewelry can be worn on the head. A few flowers will make up a beautiful ensemble on the headband.
Satin ribbon kanzashi rose flower
The second experiment with making roses with your own hands is even more interesting. Now the future rose will turn out to be airy and tender. All of her petals will tremble sensually from the breath of the breeze or at the slightest movement the mistress of the decoration.

Tools and accessories: satin fabric of a pleasant red shade, satin fabric of green color, a piece of green felt, hair clip, paper, ruler, pencil, scissors, threads, needle, candle, matches, tweezers, glue, white wire and foil.
Step 1
A paper template (or pattern) of a rose petal is made. In the figure, the paper is drawn in centimeter squares. A pencil is drawn with a pencil and cut with scissors.

Step 2
According to the pattern, satin petals are cut in the amount of 6 pieces.
Step 3
According to the pattern with an allowance of 0.5 cm, 6 more petals are cut out. They, respectively, are larger in size than the previous ones.
Step 4
The paper template is cut with scissors around the edge by 0.5 cm. Very small petals of 6 pieces are cut from it.
Step 5
All the resulting petals of the future flower are processed along the edges to prevent the fabric from shedding on the slices. For this, a candle flame is lit. Each petal is brought to it and its edge melts a little. At the time of melting, it is important to stretch the fabric. This will give the petals the desired waviness. So around the perimeter.

Step 6
On fire, the petals are concave. To do this, each of them is taken with tweezers and holds for a split second at the candle flame. The fabric itself will curl a bit.
Step 7
Assembling petals into a bud. There are two assembly techniques: when the petals are sewn in a circle, and when they are stitched together. Choose any method yourself. Using a needle and thread, each petal is sewn along the lower edge into one bud of a kanzashi flower from satin ribbons with its own hands.

Step 8
Floral stamens are made from wire and foil. The foil on the wire must be fixed with glue. After that, the finished stamens are inserted into the center of the bud and stitched with several stitches. Some craftswomen make stamens from cotton buds. In this case, the cotton tips are recommended to be painted in the desired color and after the paint dries, apply a layer of glue so that such a bright beauty does not wash off if the decoration gets in the rain.
The last are welcomed with petals.
Step 9
Making kanzashi flower foliage from satin ribbons. A green tape is used, 10 cm long. Its edges are processed using the familiar method of candle flame. The corners of the future sheet are bent to the middle and from the bottom are stitched with a basting seam, which will allow to tighten the fabric to create a wave. The strips of fabric protruding from the underside are sewn with a blind stitch.

Step 10
A circle or oval is cut out of the prepared piece of felt. First, leaves are glued to it, and then a rose. This process occurs by applying "hot glue".

A hair clip is sewn to the felt. That's all, a delicate quivering rose to decorate the head is ready!
Ball of kansashi flowers from satin ribbons
It is popular to have a coffee tree or similar coffee composition at home. What if someone is allergic to coffee? Or just don't like the smell? Make a kanzashi flower ball from satin ribbons. It is very beautiful and complements the interior with a Japanese traditional twist.

Tools and improvised materials: polystyrene foam, cardboard for a tube, glue, satin ribbon, felt (or burlap), thread, needle, scissors, curly ruler (or compasses), pencil.
Step 1
A round base is made for the flower. To do this, draw a circle on felt (or burlap).

Step 2
The circle must be given a conical shape. For this, a triangle is drawn in it, as indicated in the figure. The circle is cut out. The triangular segment is cut with scissors and the edges of the circle are sewn with a hidden seam. The result was a cone. The wider the triangle is made, the higher and sharper the cone will be, and, the smaller the ball will eventually turn out.

Step 3
A satin ribbon is applied to the cone, the edges of which are sewn to the textile base.

Step 4
The satin ribbon bends at an angle of 45 degrees. The fold is fixed with a stitch.

Step 5
The rest of the tape folds further in a circle. Angles can be changed.

Step 6
When the fabric covers the entire cone, it is cut off and hidden under a flower. Additional kanzashi flowers are made from satin ribbons in a similar way.

Step 7
A ball is cut out of the foam. A tube is curled from cardboard. The position is fixed with glue. The tube is decorated with decorative elements: thin ribbon, colored paper. In the foam ball, a recess is made for the tube, which is inserted there, previously lubricated with glue.
If it is impossible to use polystyrene in the work, it is replaced with crumpled paper wrapped with tape.
Step 8
Kanzashi flowers from satin ribbons are glued to the resulting ball. The ball is decorated with pearls.
Kansashi decoration is recommended to be placed in a small pot with decorative filler.